3.2. Using the H9000 as a Computer Audio Interface
The H9000 can stream 16 inputs and 16 outputs via USB 2.0 to/from your Windows or macOS DAW, serving as a powerful outboard effects processor for your DAW’s tracks.
3.2.1. Changing the USB Audio Sample Rate
When using the H9000 as a USB audio device, the H9000 is always the USB clock source and determines the sample rate. Since this information is not automatically communicated to the computer, the user must ensure that the H9000’s internal sample rate matches the “H9000 USB Audio” sample rate in your computer’s audio settings. It is not possible for the H9000 USB Audio sample rate to automatically follow the H9000’s internal clock or an external clock source (Word Clock, ADAT, etc.), and the user must always change the H9000 USB Audio sample rate manually.
When switching to a new sample rate, first change the H9000’s sample rate (by selecting a different internal clock source or changing the sample rate of an external source such as ADAT, Dante, etc.), then change the H9000 USB audio sample rate in your computer’s audio settings.
If the H9000 detects that the sample rates don’t match, it will mute the USB audio interface and display a warning on the front panel, and in Emote. When the sample rates match again, the warning message will be cleared and the audio un-muted.
If the H9000’s internal sample rate matches the H9000 USB Audio sample rate, but the USB Audio Mute pop-up message still appears, then toggle your computer’s H9000 USB Audio sample rate away from, and then back to, the H9000’s sample rate. This will resync the sample rate of the computer and H9000.
3.2.2. Using the H9000 with macOS
The H9000 works as a “plug and play” Core Audio device in macOS, versions 10.11 and higher. Connect a USB cable between the USB B connector on the H9000 and an available USB A port on your macOS computer. No driver installation required!
The H9000 will now be available to all CoreAudio compatible software as a 16-input, 16-output computer audio device, and can be operated at 44.1kHz, 48kHz, 88.2kHz, and 96kHz.
3.2.2.1. Using the H9000 With Your Existing Computer Audio Interface
The H9000 is an outboard effects processor, not a traditional, standalone computer audio interface with control room monitoring functions. As a result, you will likely want to use the H9000’s computer connectivity in conjunction with your main computer audio interface.
Fortunately, the macOS Core Audio system makes it easy to combine multiple audio interfaces into one large device called an “Aggregate Device.” Doing so lets you use your main audio interface and its monitoring capabilities as you always have, while also having the H9000’s 16 channels of I/O available to process tracks on your DAW session.
To Create an Aggregate Device:
In your applications folder, go to “Utilities,” then launch “Audio Midi Setup.”
In the “Audio Devices” window that appears, you should see entries for:
H9000 USB Audio
Any other computer audio interfaces you have connected
The computer’s built in audio output

Click on the “+” Icon in the lower left-hand corner and select “Create Aggregate Device”.
In the Aggregate Device configuration window that appears, select the appropriate I/O for the different devices you wish to use.
In your DAW of choice, select the Aggregate Device as your audio device for the DAW to use.
You will now have the I/O of your main audio interface AND the 16-input/output channels of the H9000 available to use in your DAW session as needed.
Ensure that the sample rates match on the following:
The H9000’s internal clock
The Aggregate Device
The H9000 USB Audio Device
Your Digital Audio Workstation
If the devices in your Aggregate Device aren’t synchronised using hardware, you must enable drift correction to compensate for drift in the data between devices. Please visit https://etide.io/mac-midi for more information about configuring drift correction.
Warning
Aggregate devices don’t always perform as well as when the interfaces are alone. You might experience digital clock source problems, dropouts, noise, or other playback related issues. If you experience poor performance or connectivity issues, an aggregate device may not be ideal.
3.2.3. Using the H9000 with Windows
The H9000 is compatible with computers running Windows 10 or 11.
In order to use the H9000 as an audio interface with Windows, please visit https://etide.io/h9000-support to download and install the Windows driver.
After downloading the .exe file, double-click the file to install it on your Windows machine and reboot your computer.
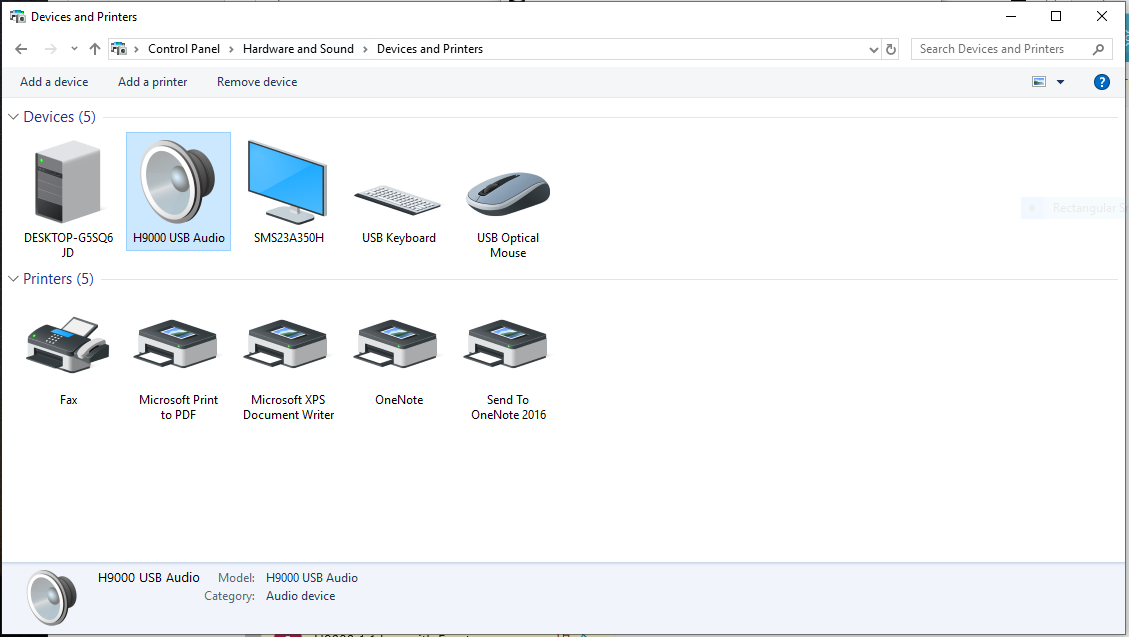
The H9000 will now appear as an audio device in the Windows “Devices and Printers” control panel, and its audio inputs and outputs can be used with any ASIO compatible software.
The H9000’s MIDI inputs and outputs are also now available to any software that works with MIDI ports.
Depending on the setup of your Windows machine, the H9000’s USB sample rate can be changed one of two ways:
Windows OS method:
Click the Windows menu bar icon on the bottom left of your screen.
Type “Sound Settings” and click the search result. The Sound Settings Window will appear.
In the Sound Settings Window, under “Related Settings”, click “Sound Control Panel.” The Sound Control Panel will appear.
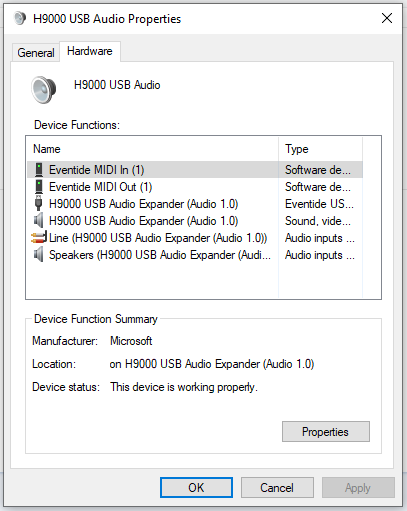
In the Sound Control Panel, under the “Playback” tab, right-click “H9000 USB Audio Expander” and click “Properties”. The Speakers Properties Window will appear.
In the Speakers Properties Window, click the “Advanced” tab. Select the appropriate sample rate, click “Apply”, then click “OK”.
Back in the Sound Control Panel, under the “Recording” tab, right-click “H9000 USB Audio Expander” and click “Properties”. The Line Properties Window will appear.
In the Line Properties Window, click the “Advanced” tab. Select the appropriate sample rate, click “Apply”, then click “OK”.
DAW method:
Set your DAW’s Audio Device to “Eventide USB Audio Device” and select the appropriate sample rate.