6.2. Routing
Routing Edit Mode adjusts the routing of the currently loaded Program.
The H90’s two Presets can be routed to process your signal in series or parallel for each Program. This is useful for a variety of applications:
If your Program uses a Distortion and Wah Wah Preset you may want to process the distortion in series with the wah wah, meaning your audio is first processed by the distortion, and then the distorted signal is processed by the wah wah.
Alternatively, if you are using a Program with Delay and Reverb Presets, you can process your audio through these two Presets in a parallel path, meaning the audio is sent to the delay and reverb simultaneously on two paths, and your delay and reverb sounds will not affect each other.
The Routing Edit Mode appears in one of two ways, depending on whether the Global Routing Configuration is set to Insert or Dual on the System Menu's Global page (Section 7.1).

Fig. 6.4 Configure your Global Routing in the System Menu page.
Note
Changing your routing from Insert to Dual will automatically enable an alternate set of available Lists as well as your current Playlist. Programs and Lists that are created with Insert routing cannot be used with Dual routing, and vice versa.
Press the Routing Button to enter Routing Edit Mode. Press any Footswitch to exit.
Pressing the P, A, or B LED Buttons will toggle active/bypass for the Program, Preset A, or Preset B.
6.2.1. Insert Routing
The Insert Routing configuration allows Routing Mode to enable either two mono Inserts or one stereo Insert, which can be placed at any point along the signal path or turned off.
Insert Routing Options | |
|---|---|
Series | Parallel |
Pre A | Pre A & B |
Parallel | Pre A |
Mid | Pre B |
Post B | Parallel |
Post A | |
Post B | |
Post A & B | |
To enable an Insert:
Quick Knob 1: Turn to change the routing between series and parallel.
Quick Knob 2: Turn to enable Insert 1 and adjust the Insert position. Press to active/bypass Insert 1.
Quick Knob 3: Turn to enable Insert 2 and adjust the Insert position. Press to active/bypass Insert 2.


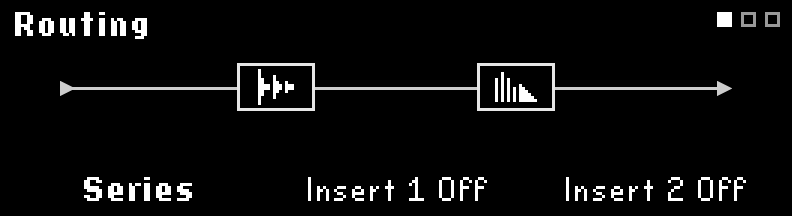
Fig. 6.7 Insert routing page with no active Inserts
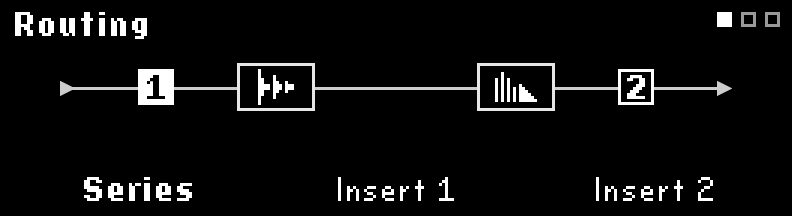
Fig. 6.8 Insert 1 pre-Preset A, Insert 2 post-Preset B
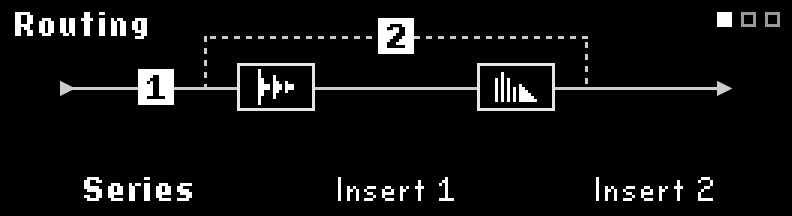
Fig. 6.9 Insert 1 pre-Preset A, Insert 2 in Parallel with Preset A & B
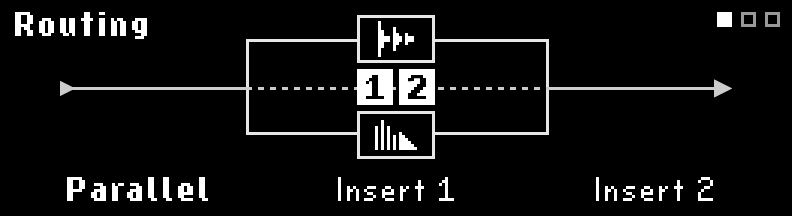
Fig. 6.10 Inserts 1 & 2 routed in Parallel with Preset A & B

Fig. 6.11 Inserts 1 & 2 in Parallel, with Insert 1 pre-Preset A, and Insert 2 post-Preset B
Turning Quick Knob 3 completely clockwise will enable stereo insert 1-2, the position of which can then be adjusted using Quick Knob 2.
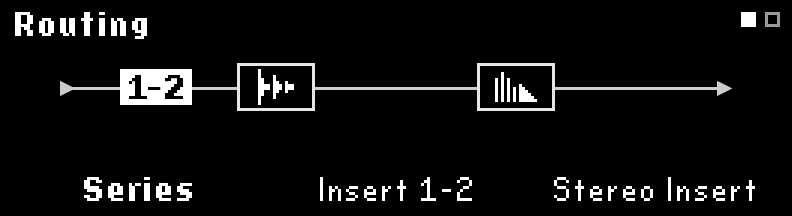
Fig. 6.12 Insert routing in Series with one stereo Insert
Each Insert has its own set of parameters: Send Level, Return Level, Mix %, Tails, Latency (from 0 samples to 512 samples), and Polarity (Normal/Inverted). Press the Routing Button or turn the Select Knob to scroll through the parameters.
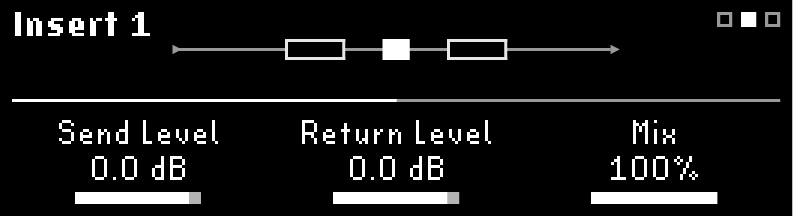
Fig. 6.13 Page 1 of the Insert parameters

Fig. 6.14 Page 2 of the Insert parameters
Turn Tails on to allow the inserted device’s effects to trail off naturally when bypassed. Turn Tails off to mute the insert immediately when bypassed.
Latency only should be set when inserting digital devices. Analog devices do not have appreciable latency. Setting the latency properly will prevent comb filtering when the Insert’s Mix isn’t 100% or 0%. Consult the inserted device’s documentation for its latency specifications.
To set the latency for an Insert:
Invert the polarity.
Set the mix to 50%.
Bypass the external digital effect or adjust any mix knob so you only hear the dry signal.
Adjust latency from 0 samples until the signal is silent or as quiet as possible.
Disengage the polarity invert.
Tip
When using Insert or Dual routing, press Quick Knob 1 to swap Presets A and B.
6.2.2. Dual Routing
Dual Routing allows you to route two processing paths within your H90. This can be used to process two instruments separately through two different Presets, or to connect to an amplifier in a Pre/Post configuration using one Preset in your preamp section and one Preset in your amp’s effects return.
Note
Programs using Dual Routing will display ![]() in the top right corner.
in the top right corner.

Fig. 6.15 Programs using Dual Routing
Turn Quick Knob 1 to change the routing position for Presets A and B on Paths 1 and 2.
Quick Knob 2 and 3 are non-functional when Routing Mode is in Dual Routing configuration.
Dual Routing enables two separate signal paths:
Path 1: Inputs 1/2 to Outputs 1/2
Path 2: Inputs 3/4 to Outputs 3/4
Dual Routing Positions | ||
|---|---|---|
Routing | Path 1 | Path 2 |
Path 1 Series | Series | Thru |
Path 1 Parallel | Parallel | Thru |
Pre/Post | Preset A | Preset B |
Path 2 Parallel | Thru | Parallel |
Path 2 Series | Thru | Series |
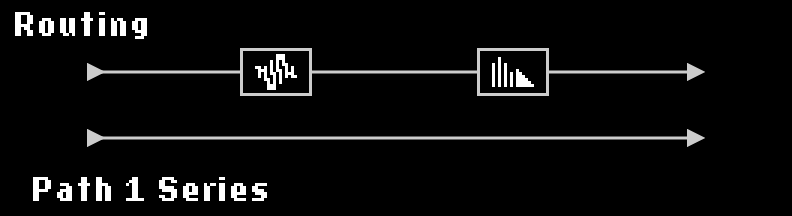
Fig. 6.16 Presets A & B in Series on Path 1
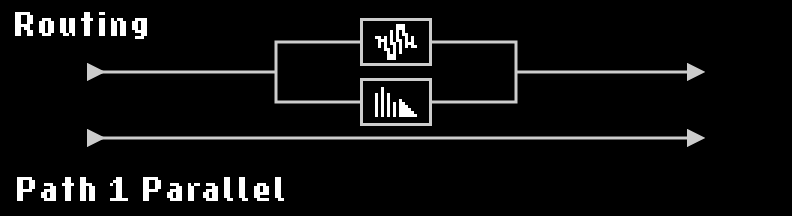
Fig. 6.17 Presets A & B in Parallel on Path 1

Fig. 6.18 Dual Routing in Pre/Post
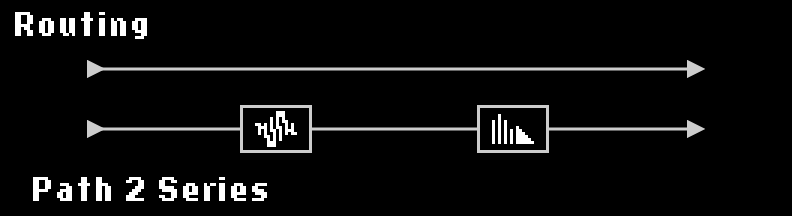
Fig. 6.19 Presets A & B in Series on Path 2
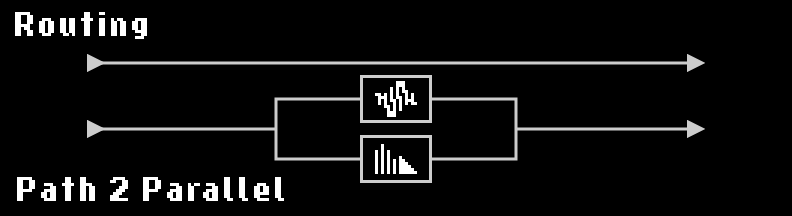
Fig. 6.20 Presets A & B in Parallel on Path 1