 Looper
60 seconds of stereo recording at full audio quality and up to 480 seconds at reduced audio quality. Salient features: record in seconds or beats, variable speed scrubbing during playback and dubbing (including reverse playback and dubbing), seamless dubbing, real-time adjustment of the loop starting point and loop length, full featured MIDI Clock sync, and the all-new 1-Button Looper.
Mix: Mix control between the Dry audio input and Looper playback.
Loop Max-Length:
When the Loop is Empty, sets the Maximum allowed Loop Length. Note that audio recording quality is degraded at slower recording speeds (1/2x and 1/4x). The maximum loop length is determined by the setting of the Rec Speed parameter as follows:
60 sec at 2x
120 sec at 1x
240 sec at 1/2x
480 sec at 1/4x
When the Loop contains audio, the Max-Length parameter cannot be adjusted.
Note
With Tempo Mode On, the range of the Max-Length parameter depends on the H90’s Tempo BPM value. Lower BPM values will not fill up the entire parameter range.
Loop Play-Start Point: When a Loop is in memory, this sets the Loop Start Point from 0 ms (or beat 1 for Tempo Sync ON) to Loop Length. Loop Play-Start Point defaults to 0 (or beat 1 for Tempo Sync ON) at the beginning of a new loop. When the Loop is Empty, this parameter is disabled.
Loop Play-Length:
When a Loop is in memory, this sets the Loop Play-Length for playback that begins at the Loop Start Point. In other words, if a 12 second Loop is recorded and the Loop Start Point is set to 2 seconds and the Loop Length is set to 4 seconds, the recorded Loop will play from 2 seconds to 6 seconds into the 12 second Loop. The Play-Length value is automatically reduced in cases where the Play-Start Point moves past the currently set Play-Length.
The Loop Play-Length defaults to Loop Length at the beginning of new loop. Note that Catchup is always enabled to prevent the end point from changing abruptly. When the Loop is Empty this parameter is disabled.
Loop Decay Rate: When dubbing you may want the original saved audio to persist as you add new sounds. Of course, indefinitely adding new signals will eventually result in ‘mud’ (the “Crayola” effect). The Decay Rate control allows the saved audio to fade as you dub new material. The Decay Rate is adjustable from 0% [DCY: 0] to 100% [DCY:100]. When set to 0%, the loop never decays. When set to 100% the previously saved audio decays completely each time through the loop when dubbing. In other words, the looped audio is only played once. The Loop Decay Rate control has no effect on normal Playback, only dubbing.
Dubbing Mode:
The Dubbing Mode choices are:
Latch: RECORD toggles Dubbing ON/OFF. Dubbed audio is added to the looped audio.
Punch: RECORD enables Dubbing while the switch is held. Dubbed audio is added to the looped audio.
Repl-Latch: RECORD toggles Dubbing ON/OFF. Dubbed audio replaces looped audio.
Repl-Punch: RECORD enables Dubbing while the switch is held. Dubbed audio replaces looped audio.
Note
Punch and Repl-Punch are not available when using the 1-button looper. Use the dedicated looper transport controls instead.
Playmode:
Playmode affects three actions of the Looper: the action when Recording reaches Max-Length, the action when Playing reaches the Play-Length, and the action of the PLAY switch.
Once: Enters Stopped state when recording reaches Max-Length. During Playback, the audio will Stop when it reaches Play-Length, PLAY at any point initiates playing the loop just one time from the loop’s start point.
Loop: Enters Stopped state when recording reaches Max-Length. During Playback, the audio loops around to the loop’s start point when it reaches Play-Length, and PLAY at any point initiates playing continuously from the loop’s start point.
Autoplay: When recording reaches the Max-Length, loop begins playing automatically and plays continuously. During Playback, the audio loops around to loop’s start point when it reaches Play-Length, and PLAY at any point will initiates playing continuously from the loop’s start point.
Rev-Direction: When recording reaches the Max-Length, loop begins playing automatically and plays continuously. During Playback, the audio loops around to loop’s start point when it reaches Play-Length, and PLAY at any point can then be used to toggle the playback direction.
Resolution:
When set to Smooth, resolution is 1%. The other Depth control settings allow you to select the Play Speed in musical intervals as follows (a negative value corresponds to Reverse Play, and all resolutions have 0% in the middle for a full Pause):
Octaves: From three octaves down to one octave up – (+/-) 12.5%, 25%, 50%, 100%, 200%
Octave+5th: Octaves and fifths – (+/-) 12.5%, 25%, 37%, 50%, 75%, 100%, 150%, 200%
Dom7th: Dominant 7th Chord (root, M3rd, 5th, m7th, representing common key modulations) – (+/-) 12.5%, 25%, 32%, 37%, 45%, 50%, 63%, 75%, 89%, 100%, 126%, 150%, 178%, 200%
Chromatic: Semi tones – (+/-) 12.5%, 25%, 26%, 28%, 30%, 32%, 33%, 35%, 37%, 40%, 42%, 45%, 47%, 50%, 53%, 56%, 59%, 63%, 67%, 71%, 75%, 79%, 84%, 89%, 94%, 100%, 106%, 112%, 119%, 126%, 133%, 140%, 150%, 159%, 168%, 178%, 189%, 200%
Record Speed:
Determines the speed at which the initial loop is recorded. Slower speeds allow for longer loop lengths but at a lower fidelity.
2x – Double
1x – Normal
1/2x – Half
1/4x – Quarter
Play Speed:
Determines the playback speed of the loop. Play Speed resolution is dependent on the setting of the Resolution control.
A negative speed with Empty causes playback to automatically start in the Reverse direction after the loop is closed, either through a PLAY button press or the Loop and Autoplay settings on the Playmode knob.
After a loop is recorded, Play Speed controls the speed of Loop playback AND dubbing over the full range of speeds allowing for continuous real-time scrubbing from one octave up in Reverse Play (-200%), to one octave up in Forward Play (200%), with a pause (0%) directly in the middle (knob set to 12 o’clock).
Filter: Controls the tone of the looped audio. Tone control filters are placed at both the input and output of the Looper. This allows you to control the tone of the audio that you’re recording and then independently control the tone on playback. Turn to the left to cut low frequencies and to the right to cut high frequencies. For flat response, set the knob to 12 o’clock.
- Tempo sync
Tempo sync allows beat-based recording and playback that stays in sync with your H90’s internal clock or with an external MIDI clock.
Note
Some devices may stop/start transmitting clock depending on the playback state. For example, a DAW or drum machine may not send clock information when the sequencer is not playing. The MIDI clock source for the H90 must be a device that always sends clock information. Consult your devices documentation to determine its MIDI behavior.
When using Tempo Sync with an external MIDI clock source, the Looper will respond to MIDI Start and Stop commands. These commands are sent by many Drum Machines, Sequencers and DAWs when used as the MIDI clock source. However, you’ll need to reference your own device or software manual for specific MIDI clock settings and Start/Stop command setup guidance.
The Looper responds to MIDI Start and Stop commands as follows for each Looper State:
Empty:
MIDI Start: Resets the Looper’s internal “beat counter” and causes a Record Footswitch press to sync up to the next beat (See the section on Footswitch Quantization below for more info on this).
MIDI Stop: No action.
Recording:
MIDI Start: Stops Recording and starts Loop Playback.
MIDI Stop: Stops Recording and goes to the Stopped State.
Dubbing:
MIDI Start: Ends Dubbing and Starts Playing from Loop Start.
MIDI Stop: Stops Loop Playback and Dubbing and goes to the Stopped State.
Playing:
MIDI Start: Retriggers to start Playing from Loop Start.
MIDI Stop: Stops Loop Playback and goes to the Stopped State.
Stopped:
MIDI Start: Starts Loop Playback
MIDI Stop: no action
- Tempo Sync Footswitch Quantization
Tip
The H90’s looper does not support MIDI Song Position Pointer (SPP) messages. Many DAWs will only send a MIDI Start command when it is played from the beginning of the transport. Certain Tempo Sync Footswitch Quantization functions will only work correctly AFTER receiving a MIDI Start command.
MIDI Clock is made up of a series 24 “ticks” per beat. Tempo Sync quantizes many of the Footswitch actions either to the next MIDI beat or the next MIDI tick. The quantization action of the Footswitches for each Looper State is as follows:
Empty:
Record: Starts a new recording synced to the next beat ONLY if synced to an external MIDI clock source and AFTER having received a MIDI Start command. Otherwise, this begins recording on the next tick.
Play: No action.
Stop: No action.
Recording:
Record: Record to Dub transition quantizes to the next beat.
Play: Record to Play transition quantizes to the next beat.
Stop: End recording and stop, quantized to the next beat.
Dubbing:
Record: End Dubbing, no footswitch quantization.
Play: End Dubbing and Start Playing from Loop Start. This action quantizes to the next tick.
Stop: End Dubbing and Stop Playing. This action quantizes to the next beat.
Playing:
Record: Start Dubbing, no footswitch quantization.
Play: Start Playing from Loop Start. This action quantizes to the next tick.
Stop: Stop Playing. This action quantizes to the next beat.
Stopped:
Record: Starts a new recording synced to the next beat ONLY if synced to an external MIDI clock source and AFTER having received a MIDI Start command. Otherwise, this begins recording on the next tick.
Play: Start Playing from Loop Start. This action quantizes to the next tick.
Stop: No action.
- Parameter Tempo Sync Features
The following control knobs have enhanced features for Tempo Sync allowing for perfect beat sync even when the tempo source changes.
Loop Play-Start Point: When using Tempo Sync, the minimum length of audio that can be played out is 1 beat so, the Play-Start Point will display in beats allowing you start playback from 0 beats up to Loop Length minus 1 beat.
For example, if you recorded an 8 beat loop, this will range from 0 to 7 beats. Changing the Play-Start Point during Playback will apply the next time the Loop comes around and will maintain perfect beat sync with the Tempo Source.
Loop Play-Length: When using Tempo Sync, the minimum length of audio that can be played out is 1 beat so, the Play-Length will display in beats allowing playback lengths of 1 beat up to the Loop Length. For example, if you recorded an 8 beat loop, the Play-Length will range from 1 to 8 beats.
Changing the Play-Length during Playback will apply the next time the Loop comes around and will maintain perfect beat sync with your Tempo Source. Of course, new Play-Lengths that don’t evenly divide the total Loop Length will cause the loop to “walk” the downbeat, thus creating interesting poly-rhythms against an existing pattern.
Speed / Varispeed: When using Tempo Sync, the Looper always loops about the current Play-Length number of beats in the originally recorded time base, regardless of changes to the Speed. Thus, for slower speeds the loop length will be truncated, and for faster speeds the loop will play through more than once. For example, if you record an 8 beat loop at 1x, then play out 8 beats at a Speed of 50 (.5x), the Looper will loop beats 1-4. Alternatively, if you choose to play at a speed 150 (1.5x), the loop will complete one full cycle of 8 beats, then a half cycle of 4 beats, and continue to loop this 1.5x pattern against the original time base. Please note that this Speed-based sync feature is temporarily disabled while Dubbing, allowing you to dub through an entire loop, and once you exit Dub mode moving back to Play, this sync feature will resume. This ensures that the Looper always maintains perfect timing with external audio, drum machines, etc. while providing the option to layer expressive pitched and poly-rhythmic patterns or even minutely controlled drifts that always come back on the downbeat.
- Performance Parameters
Record: Press the Footswitch to start recording a loop.
Play: Press the Footswitch to play a loop that has been recorded. The Playmode parameter will determine how this works.
Stop: Press the Footswitch to stop playback of the loop.
Empty: Press the Footswitch to empty the loop.
Undo/Redo: Press the Footswitch to undo the last overdub. Press it again to redo.
Direction: Toggles the direction of the loop playback between forwards/backwards.
Speed: Toggles the speed of the loop between full speed and half speed. At half speed the range of the Play Speed parameter will be limited to +/- 100.
- 1-Button Looper
The 1-button looper allows you to easily control the transport of the looper using a single Footswitch.
Press once to begin recording a loop. Press again to finish recording and play the loop.
While the loop is playing:
Press the Footswitch to toggle overdub on/off.
Press-and-hold the Footswitch to undo/redo.
Double-press the Footswitch to stop playback of the loop.
While the loop is stopped, press-and-hold the Footswitch to empty the loop.
- Using the Looper Perform Page
When the Looper algorithm is loaded into A or B, an extra page of parameters will appear in the Perform Mode. The dedicated Looper perform page gives you access to the most important transport controls using, the H90’s three on board footswitches. Unlike the other pages in Perform Mode, these footswitch cannot be assigned to other functions.
In addition to the footswitch controls, a large heads-up display provides feedback into the current state and position of the loop. The footswitch LED colors also denote the current state of the loop, for easy viewing on stage.
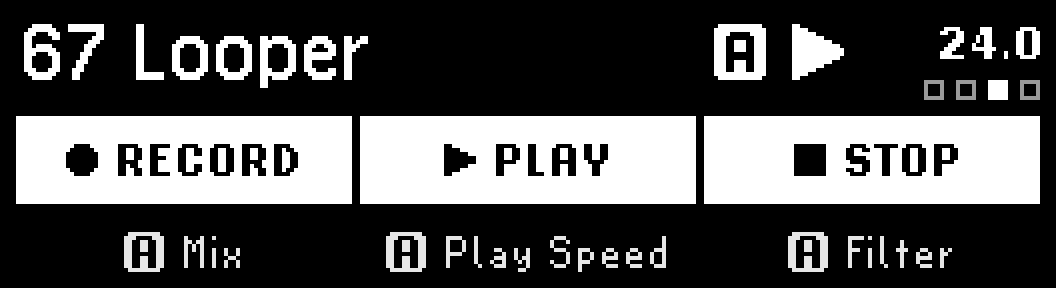
Fig. 3 The Looper displays A in the top right corner when loaded into Preset slot A.
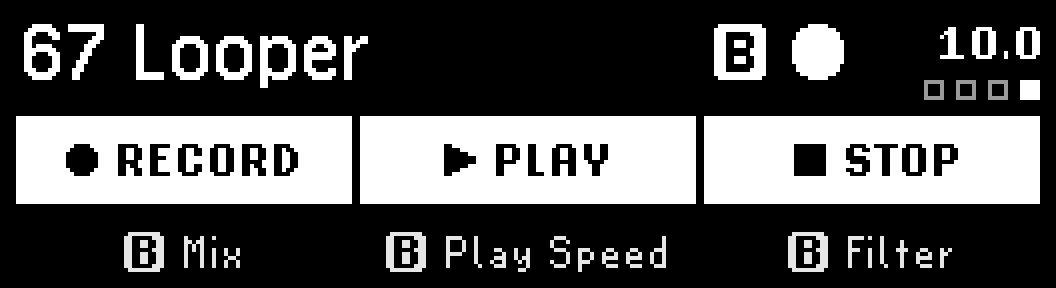
Fig. 4 The Looper displays B in the top right corner when loaded into Preset slot B.
Record (P)
Press the Footswitch to start recording a loop.
Once a loop is being recorded, this footswitch will transition to perform the Dub operation.
Play (A)
Press the Footswitch to play a loop that has been recorded.
The Playmode parameter will determine how this works.
Stop (B)
Press the Footswitch to stop playback of the loop.
While the loop is playing, press and hold the footswitch to perform the Undo/Redo operation.
While the loop is stopped, press and hold the footswitch to erase the loop.
- Factory Presets
16 Beat Auto Loop
16 Beat Reverse Start
48 Beat Basic Looper
8 Beat Punch
8 Beat Punch Replace
Basic Looper
Dub Decay Looper
LoFi 16 Beat
Long Basic Looper
Thin Loop