10.3. Edit Menu
The Edit Menu is used to edit and save Presets.
10.3.1. The Playlist
The Playlist will be displayed on the left side of the screen in all of the Edit Menu tabs.
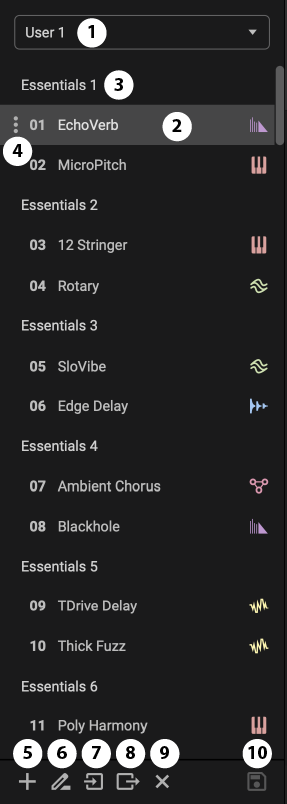
Fig. 10.5 The Playlist.
Select a List from the drop down menu.
Click any Preset to load a Preset from the Playlist. You can also navigate the Playlist using the Up and Down arrow keys.
Unsaved Changes
If your current Preset has unsaved changes, you will be prompted to save it before the new Preset is loaded.
Click “Yes” to load the new Preset after saving the changes.
Click “No” to load the new Preset without saving the changes.
Click “Cancel” to stay on the current Preset.
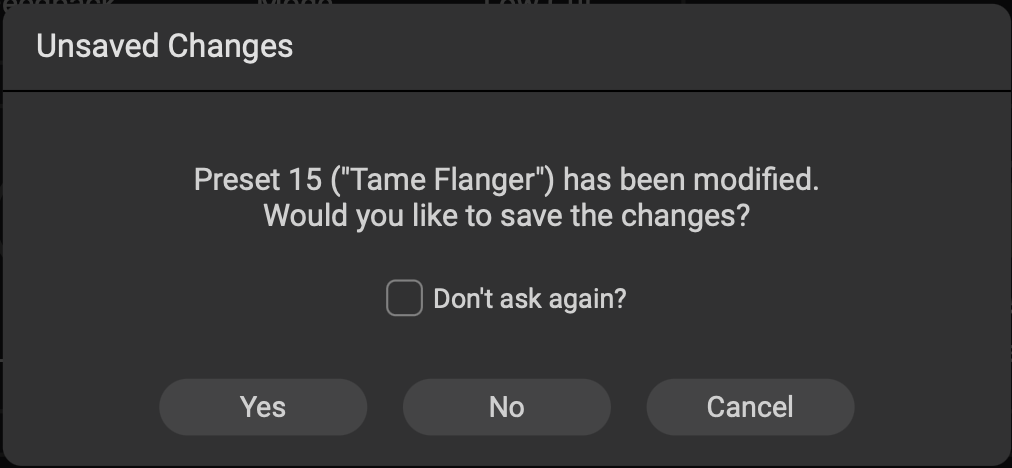
Fig. 10.6 The “Tame Flanger” Preset changes have not yet been saved.
Click a Bank to rename it, press Enter or Return to save the new Bank name.
Click the 3-dot icon for the following options:
Copy a Preset. You can then paste it to a different slot on the Playlist.
Delete/Initialize. Erase all settings of the Presets, turning it into a blank slate.
Import Preset. Load a new Preset from a location on your computer.
Export Preset. Save the Preset to a location on your computer.
Create a new List. This will automatically become the Playlist.
Rename the current List.
Import List. You can import a Preset List created using Eventide Control, or an H9 List created using H9 Control.
Export List. Save the Playlist to a location on your computer.
Delete the List. You will be prompted to make sure you would like to perform this action.
Save the current Preset.
10.3.2. Parameters Edit Menu
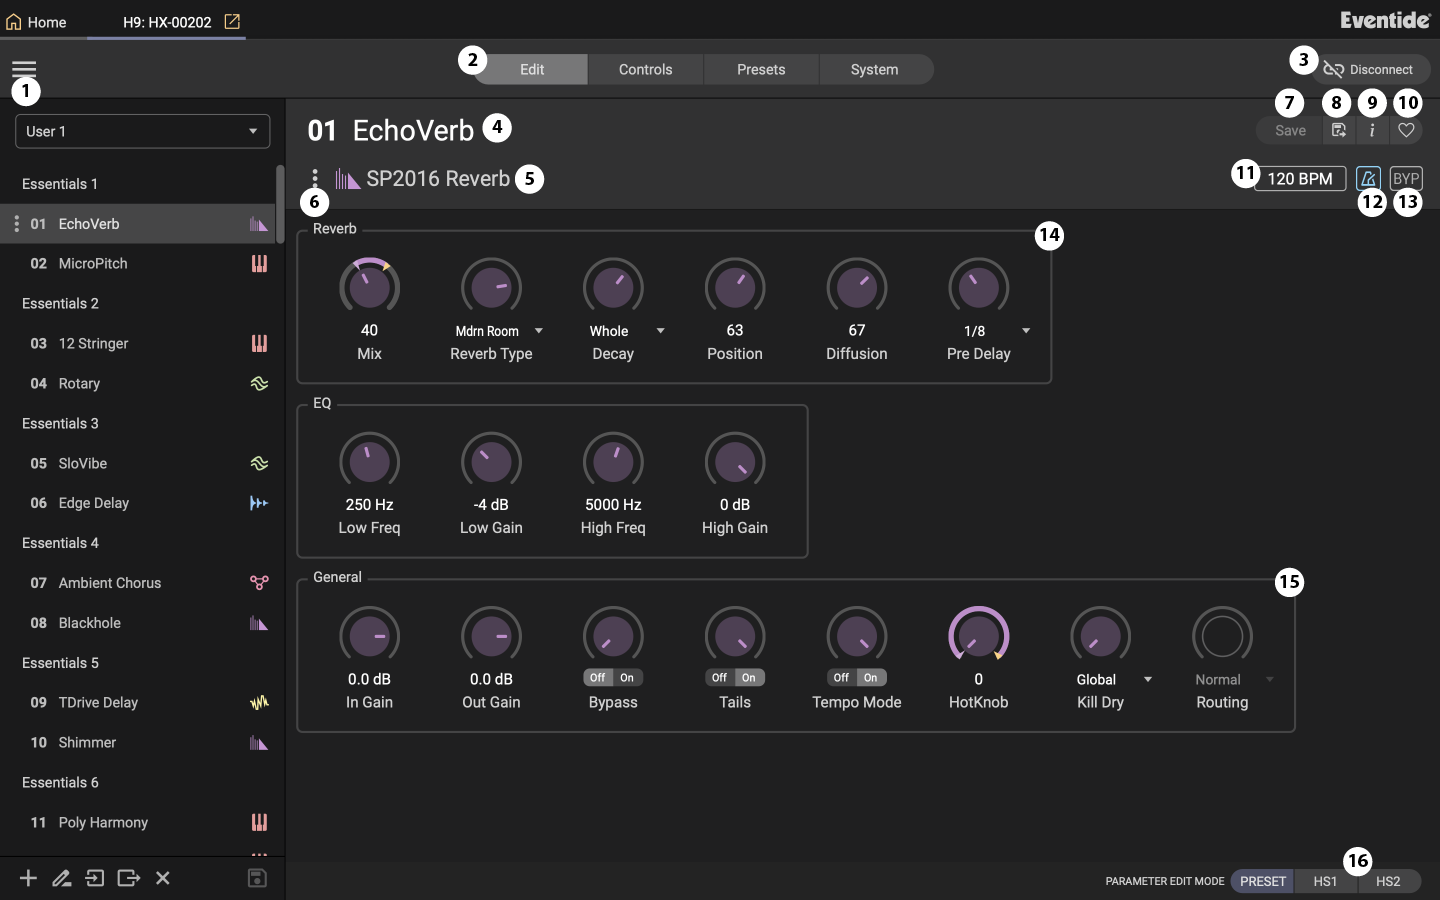
Fig. 10.7 The Parameters Edit Menu.
Click the burger icon for the following options:
View this user guide.
Open Eventide Control Logfile for support purposes.
Backup Device. This will save a full backup of all the settings on your H9 as a file on your computer.
The following settings will not be saved:
The current Preset.
The current Playlist selection, and the currently selected Preset index within the Playlist.
Other states like which Select/Perform mode you are in, Bank/List Select mode, Preset browsing filters, and Bluetooth settings.
Restore Device. Choose a file from your computer from a previous backup and restore that state. Note that the current state of your pedal and all settings will be overwritten by this backup state.
Save pedal logs for support purposes.
Click the tab to choose to view the Edit menu, External Controls, Preset Library, or System Settings.
Disconnect your H9. You will need to reconnect your H9 again from the Home page.
Click the Preset’s name to select a new Preset from the dropdown menu, or rename the Preset.
Click the Algorithm title to select a new Algorithm from the dropdown menu.
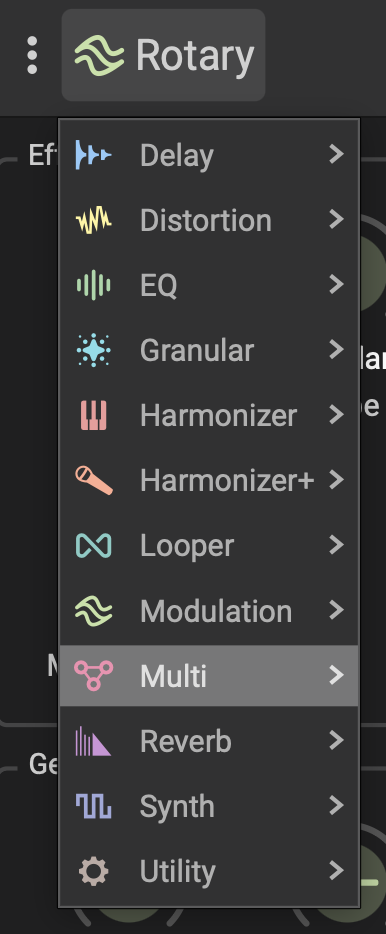
Fig. 10.8 Select an Algorithm from the dropdown menu.
Click the 3-dot icon for the following options:
View algorithm documentation.
Export the preset to a location on your computer.
Import a preset from a location on your computer.
Save the Preset.
Save your Changes!
Just like the pedal, whenever any parameter is changed you will see an asterisk next to the Preset’s name indicating unsaved changes.
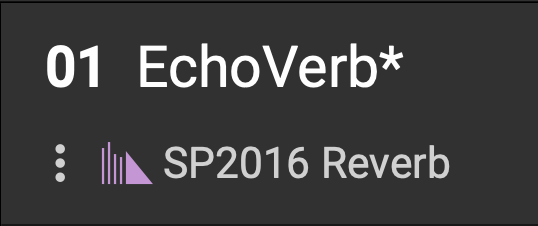
Fig. 10.9 The asterisk indicates unsaved changes. Click the Save button in the top right or bottom left corner of the screen to save your changes.
Save the Preset to a new List location.
View and edit Preset Notes.
Add the Preset to Favorites.
Adjust the BPM setting.
Turn Tempo Sync on/off.
Bypass the Preset.
Edit Algorithm-specific parameters, such as Mix, Delay Time, etc.
Edit General parameters, such as the HotKnob, Input/Output Gain, Routing, Tails, and Kill Dry settings.
Select HotSwitch 1-2, and edit parameters for the selected HotSwitch.
10.3.3. Control Assignments
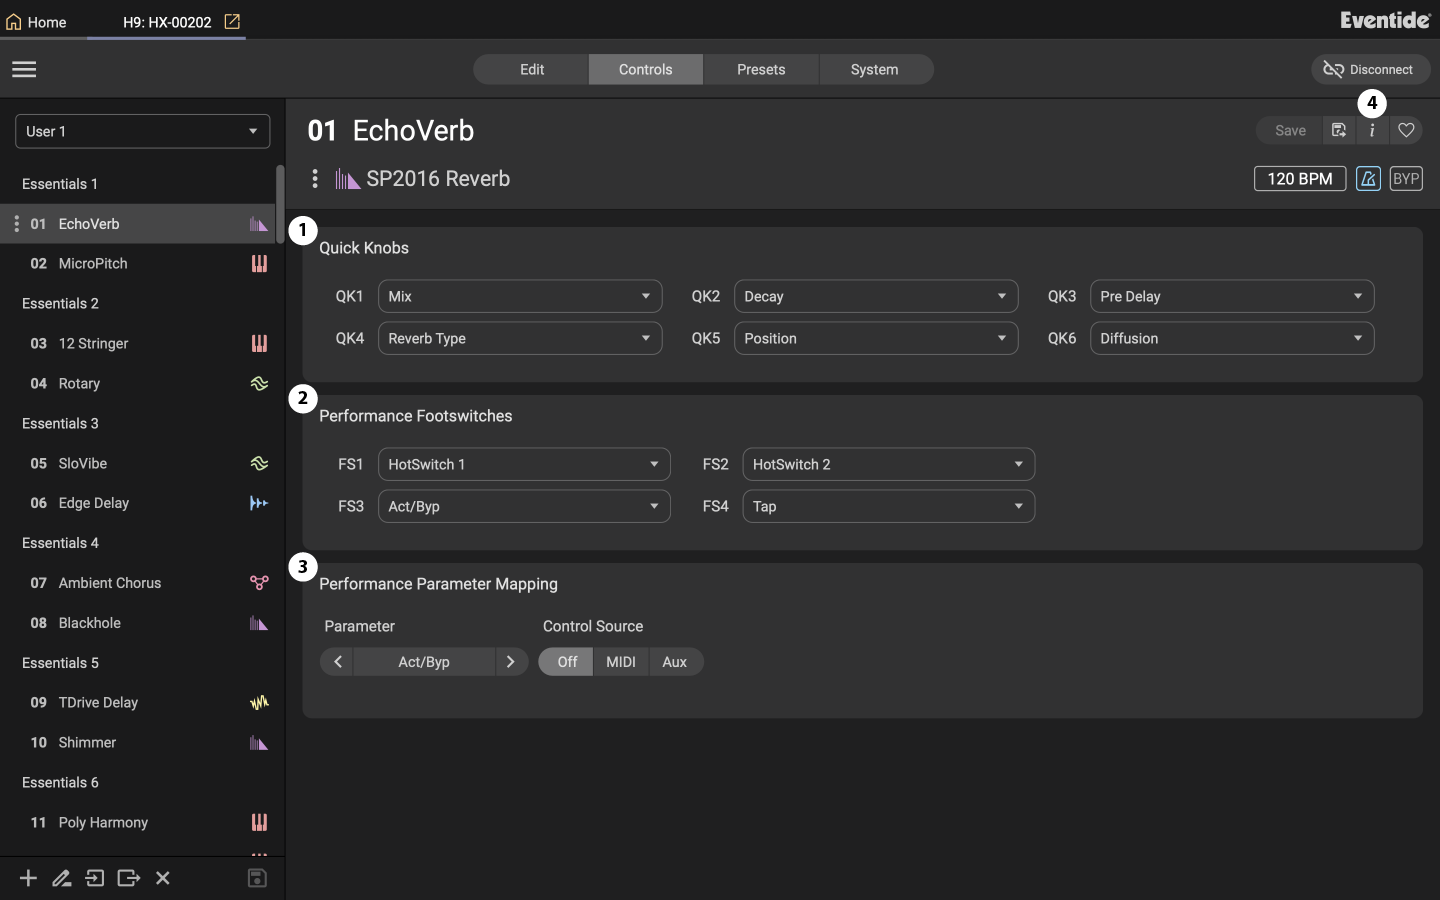
Fig. 10.10 The Control Assignments edit menu.
Assign parameters to the 6 available Quick Knobs.
Assign Performance Parameters and HotSwitches to the 4 onboard footswitches.
Assign external controllers to the available Performance Parameters:
Click the parameter drop down menu to select a parameter.
Select a MIDI CC or Aux switch as the control source.
More information can be found in the Performance Parameters section of the user manual.
10.3.4. Preset Library
The Preset Library is where you will manage all of the saved Presets on your H9. It is also used for organizing your Presets into Lists.
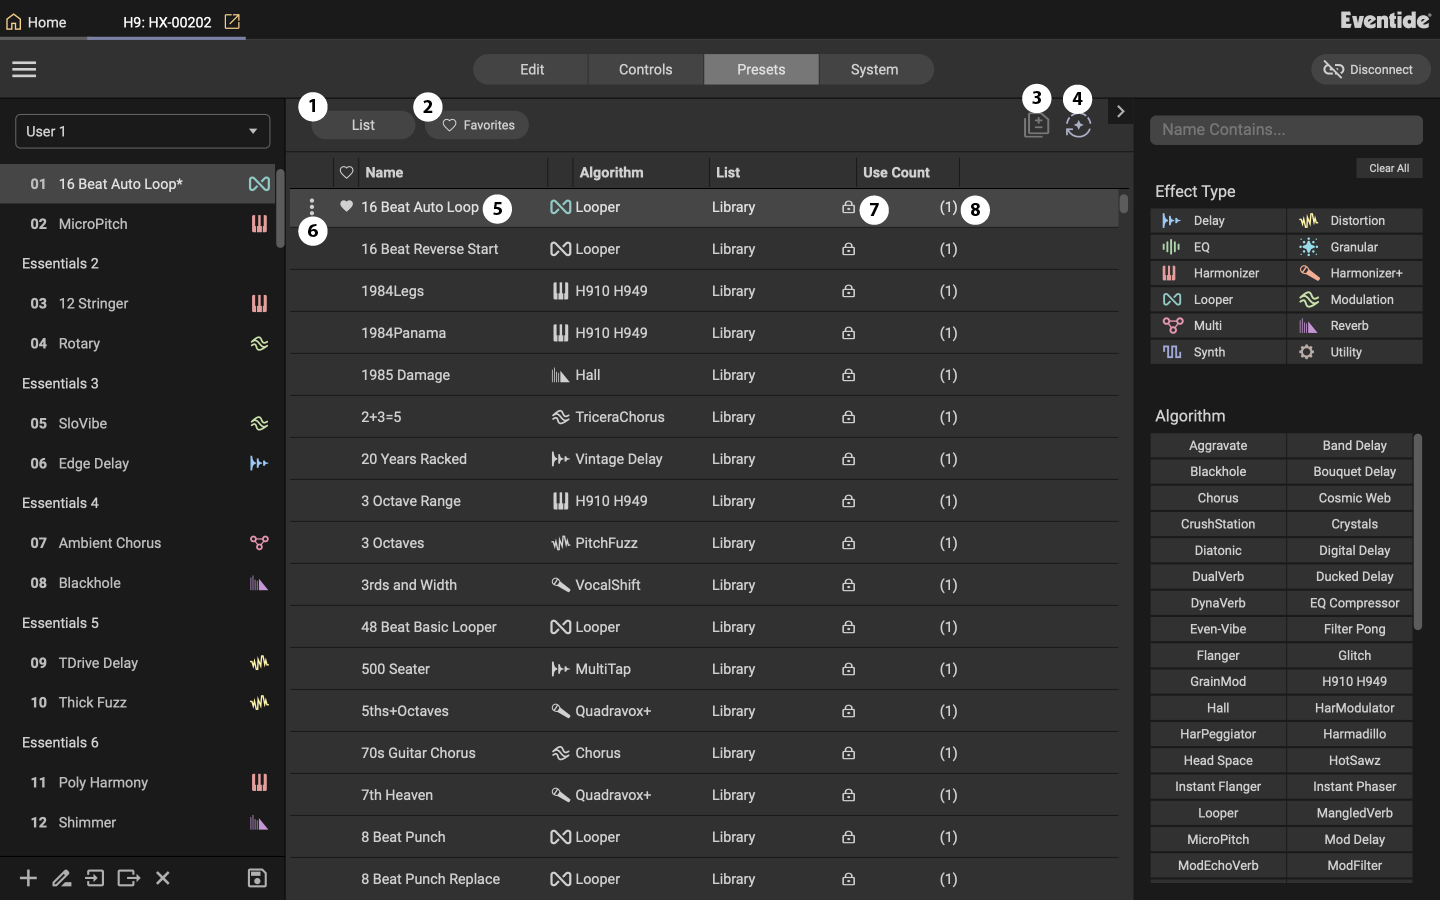
Fig. 10.11 The Preset Library.
Click here to only show Presets from a specific List.
Click here to only show favorited Presets.
Hide duplicate Presets that are present on many Lists.
Preset Auto-load:
When enabled, Presets will load immediately when selected.
When disabled, double-click or press Enter to load a Preset.
Click anywhere on the Preset text to load it, depending on your Auto-Load setting. Click and drag a Preset to a List location on the Playlist to overwrite the Preset in that location.
Click the 3-dot icon to copy a Preset. You may then Paste it to another List location by clicking the 3-dot icon on a one of the 99 Presets from the current Playlist.
The Lock icon indicates a Factory Preset. This cannot be overwritten.
The Use Count number displays how many Lists the Presets is in.
10.3.4.1. Preset Browser
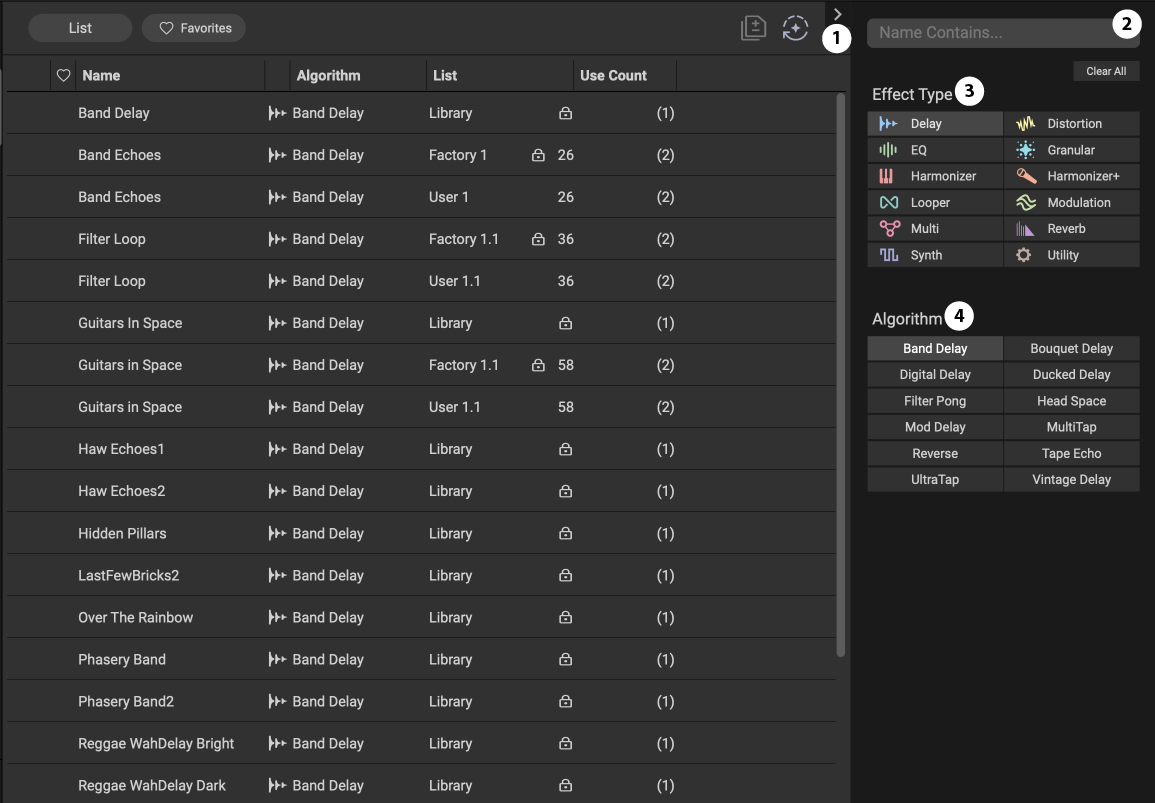
Fig. 10.12 The Preset Browser with the Delay and Band Delay filters applied.
Click the Arrow to show/hide the search bar.
Use the Search Bar to search for Presets by name.
Use the Effect Type filter to search for all Presets that contain a certain effect type.
Use the Algorithm filter to search for all Presets that contain a specific Algorithm.